|
Upload Files |
Be Another Satisfied Customer! "I received the cookbooks today and they are gorgeous! Thank you so much for all of you and your family's help getting this together and printed! You all have great customer service, and I look forward to working with you in the future! Thank you for getting them printed and out to me so quickly. Despite changes, and three versions, they landed on my doorstep exactly when promised, right on time to bring some smiles to Moms and Grandmas for Mother's Day! " Lisa Herr Field Station Cooperative Pre-School |
 |
| A Step-By-Step Guide to Exporting PDF from InDesign For Printing... | |
|---|---|
| Please Note: The following is based on Adobe InDesign CS5.5 and Windows 7. Your installation appearance may vary. | |
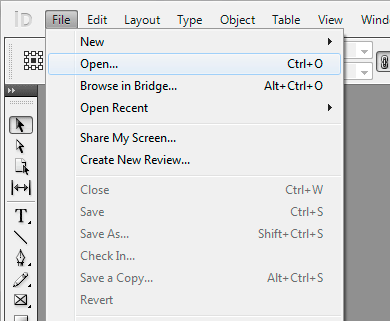 |
Open Your InDesign Document:
Keyboard Shortcuts are available as well. Windows: "Ctrl + O" Mac: "Apple + O" Browse to and Select your file and click "Open". |
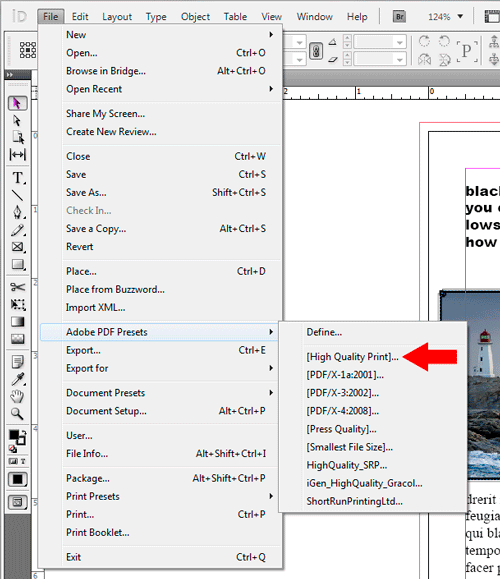 |
Select High Quality Print Option:
Click "File". Click "Adobe PDF Presets" Flyout. Select "High Quality Print" and Left Click. |
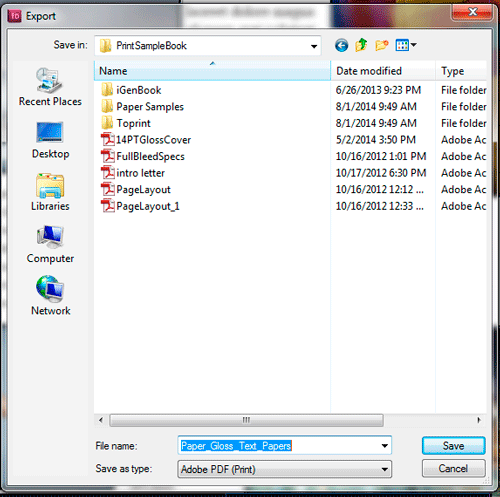 |
Set and Save PDF Filename:
Browse to where you would like to save the Exported PDF File and set the name in the "File Name" box. Once Finished, Click "Save". Please Note: Your file is not exported until you complete the next steps. |
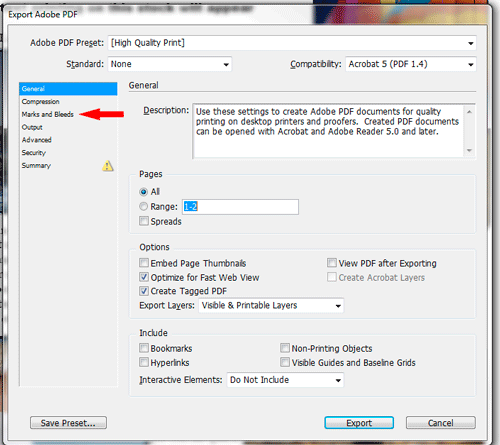 |
Export Options Window:
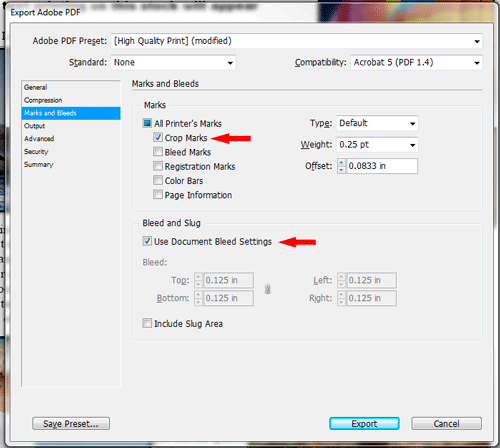
You will then be presented with the export options window. Click the "Marks And Bleeds" option on the left. Mac users, be advised you *usually* will have a dropdown that will contain this option instead. |
 |
Check Options:
The only two items you should check are:
When you check the "Use Document Bleed Settings" check box, the Bleed selections *should* grey out and show 0.125in in each of the four fields as shown in the picture to the left. If they do not, please cancel and visit our tutorial on setting up your document for "Full Bleed Printing" by visiting Here as your InDesign Document is not set up properly. Why all this hassle? We must have proper PDF files from you to deliver the High Quality printing we are known for. If you do not provide proper PDF files, you may experience issues with your finished pieces or delays in the delivery of your project. Please Note: If your files are not set up properly for bleed and you request a refund due to quality issues relating to bleed, your request will be denied. |
Copyright 2009-2015, ShortRunPrintingLtd.com
Session ID: 7kqato2alorl4h52v4ssvjohu4 - July 27, 2024 3:17:06AM MST
